Blog

  • Tags & Classes Sortable Addon (Add-ons)

    Tags & Classes Sortable Addon (Add-ons)

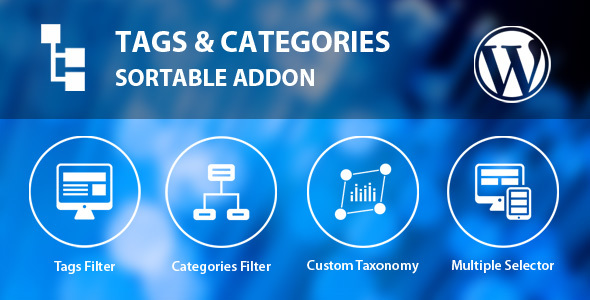
    Tags & Categories Sortable Filter Addon

    The Tags & Categories Addon of the Sortable plugin gives you an option to show a filter of your tags, categories and custom taxonomies.
    The plugin is using the default Sortable system of loading posts via Ajax. Every time you select a tag or category, the default ajax call will get the posts that have that tag or category.

    The script supports multiple selections of categories, so that all posts from the categories selected are queried.
    There is an automatic script that gets all custom taxonomies of the selected post type. For example if you select the “post” type it will get categories, tags and post formats, but for products it may be product categories, sizes, packages etc. There is no need to make any custom adjustments – all filters are automatically retrieved.

    This plugin is 100% responsive and supports different colors just like the Sortable plugin.

    Note: This plugin only works if you have the Sortable plugin already installed.

    Support

    We take excellent care of our customers and make sure that they successfully install, setup and use this plugin.

    You can use the comments section of this plugin to post any comments that may be helpful for others to know as well.

    Our Facebook page are available to assist you if you send us a message there, and you can always sends an email at support@wpicode.com.

    Keep us motivated to deliver new features by giving us a good rating in your Downloads page. Thank You!

    FAQs

    Please check the FAQs available on CodeCanyon

    Change log

    • 1/10/2016
      Initial upload on CodeCanyon
  • Simple Digital Downloads for Visible Composer (Add-ons)

    Simple Digital Downloads for Visible Composer (Add-ons)

    The 6 best EDD Visual Composer addons you’ll ever need to power up your EDD Marketplace!

    Grid – Display your EDD downloads inside a repsonsive grid. Supporting multiple columns and pagination.

    Slider – Create multiple sliders to show off your EDD downloads.

    Item Widget block – Display your EDD downloads just like a magazine wordpress website.

    Filter – A filterable grid to display your EDD downloads. Supporting single layout or multiple ones.

    Category – A category block that displays not only subcategories, but also the authors’ avatar who posted their work inside that specific category. Along with other useful stats.

    Our professional tip: Best used with the grid addon. Or even better, our slider.

    Author – Display any author (vendor), along with their profiles, links and portfolio items on your website. No EDD website is complete without this one.

    All these 6 addons supports up to 5 different designs and at least the following sorting options:

    Date, ID, Author, Title, Modified, Comment Count, Meta Value, Meta Value Number, and Random.

    Don’t forget to check out our demo!

  • Internet Tour builder for Visible Composer WP (Add-ons)

    Internet Tour builder for Visible Composer WP (Add-ons)

    Web tour builder for Visual Composer is a WordPress plugin that provides a quick and easy way to create an instruction tour through your website. Moreover you will be provided with multiple options to make your best own tour.

    FEATURES:

    • Fancy effect transition.
    • Add-on for Visual Composer.
    • Customizable popup (tittle, content and control buttons) and auto custom margin padding.
    • Flexible tooltips position.
    • Responsive. One time tour only for one visitor
    • Cookies options.
    • Unlimited colors.
    • Customizable speed and background.
    • Easy to config with the theme.
    • Allowing to activate tooltips by time or buttons with flexible options.

    DOCUMENT

    • Installation and Instruction manual can be found at the download package
    • If you can’t find what you need please do not hesitate to contact our support team at support@zotheme.com

    Content options:

    Tour box content position

    Full support for Visual Composer position

    ------------ [09-01-2016] ----------- 
    #! Initial Release
    
  • Peron – Inventive Multi-Goal WordPress Theme (Inventive)

    Peron – Inventive Multi-Goal WordPress Theme (Inventive)

    Don’t forget to rate if you enjoy the theme!

    Peron

    • Modern design
    • Free Google Fonts
    • Visual Composer Included
    • Unlimited Colors
    • Powerful Admin Panel
    • One-Click Demo Install
    • Customize Logo, Favicon, Apple devices icons
    • Shortcodes
    • Sidebar Positions
      • Sidebar Left Position
      • Sidebar Right Position
      • No Sidebar
    • Page Loader
    • Fontawesome Icons
    • Documentation Included
    • 24/7 Support
    • End Much more

    Note: All images are just used for preview purpose only and not included in the final purchase files.

  • Vicons – Font Icons for WordPress (Utilities)

    Vicons – Font Icons for WordPress (Utilities)

    Vicons is a premium WordPress plugin. You can easily add font icons to your WordPress site with a click of a button.

    WordPress 4.4 Ready!

    Vicons adds support for over 2000 icons. It can be used for different purposes on your WordPress site by simply inserting shortcodes into posts, pages, menus, widgets, menus & custom post types.

    Easy to use

    Vicons Plugin Features

    • 2000+ Font Icons to Choose
    • Insert Icons Directly Into Posts/Pages/Widgets/Menus/Custom Post Types
    • Easy to use Shortcodes
    • Animated Icons (Spinning)
    • Easily Customize Color and Size of icons
    • Responsive Ready
    • No need to write a single line of code

    Changelog

    Version 1.0

    -First Release [12.01.2016]

  • WavePlayer – a WordPress audio plugin (Media)

    WavePlayer – a WordPress audio plugin (Media)

    WavePlayer is a fully customizable, responsive HTML5 audio plugin for WordPress. Its interface is built around the waveform of the audio file that is playing back.

    MAIN FEATURES

    • responsive interface, with a modern looking style
    • HTML5 support
    • four different sizes that automatically adapt to your page
    • full integration with the WordPress Media Manager
    • Visual Editor in WordPress Post Editor
    • archival of peak files for an instantaneous access to the waveforms
    • completely customizable color scheme for the waveform visualization
    • uses the audio file featured image as a thumbnail for the player
    • creates single track or playlist players with one simple shortcode
    • multiple players per page
    • each player can be configured independently from the others in the same website or even in the same page
    • overrides the default shortcode

    INSTALLATION

    1. In WordPress Plugins section, click on the Add new button, right beside the Plugins page title.
    2. Click on the Upload Plugin button, right beside the Add Plugins page title.
    3. Click on the Choose file button and browse to the location where you downloaded the waveplayer.zip file. When you are done, press on the Install now button.
    4. Once WordPress has finished uploading the plugin files, click on the Activate Plugin link.
    5. The plugin is now active. You can click on the Settings link right below its name or go to Settings -> WavePlayer to configure its options.

    CONFIGURATION

    1. In order to create a new instance of WavePlayer, simply create or edit the Post or the Page where you want to add the WavePlayer and click on the Add Media button, right above the Visual Editor toolbars.
    2. In the left sidebar, together with all the other elements WordPress allows you to create, you will find a menu to create a new instance of WavePlayer. Click on Create Waveplayer.
    3. Like when you create a new playlist, in this following screen you can select the tracks you want to use in this instance of Waveplayer. Select as many as you like, clicking on their thumbnails*. You can deselect a track that you have previously selected simply clicking on the button.
    4. When you are done selecting the tracks you want to include in this instance of Waveplayer, click on the Create a new waveplayer button.
    5. While you are editing the current playlist, you can still add more tracks you might have forgotten, simply clicking on the Add to Waveplayer menu.
    6. If you want to reorder the selected tracks, you simply have to drag and drop their thumbnails.
    7. If you like so, you can reverse the current order of the tracks, clicking on the Reverse order button. Since tracks are added by default in their uploaded order, this might be useful in case you uploaded an ordered list of files, e.g. numbered tracks from a certain album.
    8. If you need to remove a track from this instance of Waveplayer, you can simply click on the button of its thumbnail.
    9. You can even rename each track without leaving this editor.
    10. Now it is time for you to adjust the settings for this instance of Waveplayer. You can change the size of the player, the shape of the thumbnail, the coloring of the waveform and other options, such as autoplay, repeat_all and shuffle. The default settings can be configured in the Settings –> Waveplayer page.
    11. Finally, click on the Insert Waveplayer button to add to your post the instance you have just finished creating.
    12. The instance will appear inside the post your are currently editing, with the same interface it will display on the front end. Selecting the instance, you can even interact with it, exactly as you were in the resulting page. If you want to alter the selected instance, simply click on the Edit button (pencil icon). This will open again the settings page.
    13. You can alter the current instance, adding or removing tracks and changing the current options. When you are done with the changes, click on the Update Waveplayer button. The instance currently selected will change accordingly.

    CHANGE LOG

    v1.0.15 (5 January 2016)
    * first release
    
  • Popscroll: Social Popup Footer Field – Simply scroll down (Social Networking)

    Popscroll: Social Popup Footer Field – Simply scroll down (Social Networking)

    Social Popscrolll Scroll down to Bottom

    About this WordPress plugin

    Popscroll is a good way to get user friendly attention for your Fanpage.
    It doesn’t distract the user while browsing.
    When the user reached the end, the Popscroll Box is shown.

    Social Popup Footer Box

    Supports:

    • Facebook
    • Google+
    • Twitter
    • YouTube

    Popscroll Themes

    Choose your Color

    Facebook Scroll Box Footer

    Key Features:

    • Social Network Integration
    • Different Themes
    • Customize the Appearance
    • Different Ainmation Styles (Slide or 3D Flip)
    • Live Preview in Backend
    • Specify the Point where the Popscroll will be shown
    • Different Position Options(Left, Right, Bottom, Side)
    • User friendly
    • IE8/IE9 Fallback for CSS 3D Animation and SVG
    • Free Updates
  • Stunning Watercolor – Hand Painted Ingenious WordPress (Ingenious)

    Stunning Watercolor – Hand Painted Ingenious WordPress (Ingenious)

    Beautiful WaterColor WordPress - Premium WordPress theme


    Beautiful is a creative WordPress theme that is easy to setup and comes with a great set of features. The graphics in this theme have been hand painted by our in house artist, you cannot get more than that! This theme is perfect for your online creative shop website.

    • WordPress 4.4.1 compatible!
    • Brand new easy installation wizardwatch the video to see how great this really is.
    • Creative and easily Customizable Design
    • No complicated frameworks – if you need to do advanced changes it will be easy
    • Some great included shortcodes (click here to see) – including Google Maps, Fancy Lines, Banners and over 600 icons.
    • Easy sidebar manager (hide/show sidebar on each page, left/right/footer widgets)
    • Built in image style/decoration – make your inserted images look great with a nice framed decoration – See the demo
    • Hand drawn widget styles – decorate your widgets to create that look – see demo
    • Six color options included: Pink, Purple, Grey, Green, Gold and Blue. You can easily change the colors of most fonts through the Customize menu.
    • Easy Font Customizer – change sizes, colors, padding and more.
    • Professional e-Commerce option with WooCommerce: example
    • Responsive CSS Layout – iPhone and Tablet friendly (can be disabled as well)
    • LESS files included for some of the CSS files (optional)
    • Contact Forms through ContactForm7 plugin: example
    • Easy theme customizations
    • Full Documentation provided – check it out!
    • Straight forward CSS and HTML markup making it easy for more advanced users to customize
    • Default content included so you can get up and running like the demo site in no time (watch the video to see how easy it really is)


    Seven Photoshop Documents Included


    Step by Step WordPress Installer

    Hand Painted WordPress Theme

    Easy Sidebar Widgets

    Creative

    Responsive

    Visual Columns

    Easy Creative Text Banners

    Animated Image Banner Video

    Creative Widget Decorations

    eCommerce with WooCommerce

    Check out the full documentation available here: http://dtbaker.net/envato/documentation/beautiful-hand-painted-wordpress-theme/


    beautiful Theme - Part of our Creative WordPress Theme Series
    Boutique Kids Creative - WordPress WooCommerce - ThemeForest Item for Sale Pulp - Responsive Creative Blog & Shop - ThemeForest Item for Sale Sunny Kids - Responsive Creative WooCommerce Theme - ThemeForest Item for Sale Mommy Blog - Premium WordPress Jigoshop Theme - ThemeForest Item for Sale Child Care Creative - Shop and Kids Theme - ThemeForest Item for Sale Travel Island - Responsive JigoShop e-Commerce WordPress Theme - ThemeForest Item for Sale

    Quick Setup Guide:

    New to websites? Here are the steps you need to follow to get up and running with this website theme.

    1. Purchase a “domain name” (e.g. yourbusiness.com)
    2. Purchase “WordPress website hosting” (hosting is the computer server that runs your website and emails 24/7)
    3. Some popular providers for domain names and hosting are: BlueHost, DreamHost and WPengine. Generally the more you pay the faster your website will load.
    4. Talk to your chosen hosting provider to setup your “WordPress” and make sure it works. You should be able to login to your “WordPress Dashboard” with a username and password.
    5. Once you are at this point, come back here and purchase this WordPress theme.
    6. Once purchased, go to http://themeforest.net/downloads and press “Download” and then “Installable WordPress file only”. This will download a small 16MB zip file to your desktop.
    7. Login to your WordPress dashboard, go to Appearance > Themes > Add New > Upload and choose the ZIP file you just downloaded.
    8. After uploading the theme to WordPress choose the “Activate” option
    9. Follow the setup wizard steps.

    Requirements

    • Some basic knowledge on how to use WordPress
    • WordPress 4.4 or above running on your website
    • The ability to install WordPress themes and plugins


    Support

    dtbaker Creative WordPress Theme Support
    Click here to access the Support ForumClick here to access the Email Support
    about dtbakerand our design process


    We hope you enjoy this theme, we had a great time making it. Thanks!

  • bbPress Thread Prefixes (Boards)

    bbPress Thread Prefixes (Boards)

    bbPress Thread Prefixes WordPress Plugin

    This plugin will add the feature of easily generating prefixes for topics and assigning groups of prefixes for each forum in the admin section.

    These prefixes can be a requirement for users while creating or editing topics, you can set the prefixes to filter the topic title and appear within titles, or appear separately as clickable icons which will pull up all topics that have this thread prefix assigned.

    You can set default colors and background colors with flexibility with color pickers, add further CSS styles and customize any prefix.

    You can also exclude users from assigning prefixes to topics and leave this tool for site moderators or admins only.

    Moderators or admins can set the prefix groups for forums in the post admin while creating or editing forums, and set prefix for topics when editing topics in the admin section.

    The thread prefixes feature is already available in several forum boards, such as MyBB, Xenforo and other softwares but not in bbPress.

    Prefix Styles

    Within topic title

    This setting will allow you to insert the selected prefix within the topic title which will be always filtered and set to contain the prefix. With this setting, you can still access the prefixes archives and pull topics which have the same prefix assigned.

    A live simple example of this is WordPress.org support forums; when a topic is marked resolved by a user, a prefix [Resloved] is being inserted right before the thread title: [Resloved] Topic title

    Separate prefix as icon

    With this setting on, prefixes will appear as styled icons, clickable or not, pointing to the archives page.

    You can style any prefix by its own while adding or editing the prefix as option in the plugin admin section

    Further extending & customization

    bbPress Thread Prefixes comes with ready action and filter hooks which you can use to easily add custom content and override settings and existing content etc.

    A list of hooks you can use is included in the plugin pack in a text file with examples and further information

    If you have suggestions or need more hooks, let me know.

    Changelog

    0.1 – initial release — January 2016

    Other bbPress Plugins:

    bbPress Ultimate: Social profiles, country flags and much more dynamic info to embed to forums and bbPress/BuddyPress profiles

    Sign up for the newsletter for more